
Microsoft’s current Display settings guidance confirms that resolution is changed per display, not globally. Start there before reinstalling anything. A driver reset or reinstall can restore missing modes, but it also interrupts the display temporarily and is best used after confirming that Windows is working with the correct monitor.
Windows 10 remains covered by the steps below, but its regular support ended on October 14, 2025. For a machine still on Windows 10, resolve the display fault first, then plan an upgrade or replacement rather than treating a driver repair as long-term operating-system maintenance.
 Select the screen Windows is actually configuring
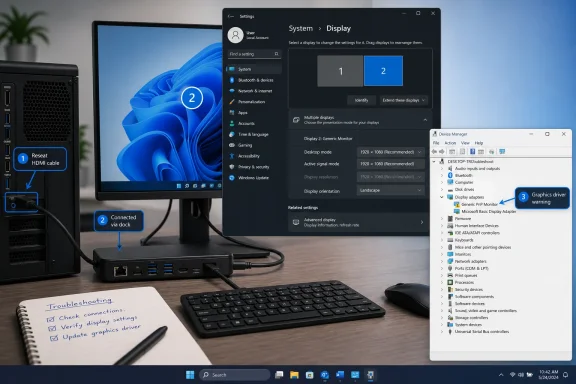
Open Settings > System > Display. At the top of the page, Windows shows numbered rectangles representing the screens it currently detects. Click the rectangle matching the display whose resolution you want to change, then scroll to Scale & layout.
This sounds elementary, but it resolves a common multi-monitor mistake: the grayed-out control can belong to a disconnected display, a disabled secondary panel, or a screen that Windows is duplicating rather than actively driving as an independent output. Use Identify to make each physical monitor show its number, then select the correct one in Settings.
If the external monitor does not appear at all, expand the Multiple displays area and choose Detect. Also press Windows+P and select Extend if the goal is to run the external display as a separate desktop. Duplicate intentionally asks Windows to find a display mode both screens can use, which can restrict the available resolution and refresh-rate choices. A display splitter adds another limitation: it usually duplicates one signal and does not create separate monitors that Windows can configure independently.
When the display appears but the resolution drop-down is unavailable, restart the graphics stack before making deeper changes. Press Windows+Ctrl+Shift+B. The screen may flicker and a short beep may play; Microsoft documents that key combination as a graphics-driver reset. Reopen Display settings after the reset.
A normal resolution selector should offer choices, with one marked Recommended. Microsoft advises using that mode because it is ordinarily the panel’s native resolution. Choosing a lower mode can make text less sharp, introduce black borders, stretch the desktop, or center a smaller image.
Rule out the monitor, cable, dock, and input path
A Windows PC does not invent its list of supported display modes. The graphics hardware and operating system depend on capability data supplied by the connected display. Microsoft’s Windows hardware documentation calls this EDID, or Extended Display Identification Data; it identifies a monitor and communicates timing information, including the preferred resolution. If the PC cannot read that data reliably, the driver may expose only a limited fallback mode—or no editable resolution choice.
For an external screen, do the physical checks before treating the issue as a Windows configuration problem:
- Power the monitor off and back on, then confirm the monitor’s own input menu is set to the port actually in use.
- Reseat both ends of the HDMI, DisplayPort, USB-C, or dock connection. Do not assume a cable is sound merely because it can show an image.
- Test with a known-good cable, a different output port on the computer, or another input on the monitor.
- If a dock, KVM switch, USB-C hub, capture device, or adapter sits between the PC and the monitor, temporarily connect the display directly to the computer.
- Test the monitor with another computer, or test the PC with another monitor or television, to determine which side of the connection is responsible.
Microsoft’s external-monitor troubleshooting guidance specifically recommends trying another cable, output port, and display. These are diagnostic tests, not ritual: a direct, stable connection lets Windows read the display’s capabilities without an intermediary that may have bandwidth, firmware, or compatibility limits.
Be especially cautious with inexpensive USB-C adapters and older docks. A USB-C port can carry data only, video only in certain modes, or video subject to the capabilities of the PC, cable, dock, and display. A picture at 1080p does not prove that the path can support 4K, high refresh rates, HDR, or multiple screens. Do not force a custom resolution in third-party GPU software to compensate for a connection Windows cannot validate; an unsupported timing can produce a blank screen or an unstable signal.
Check Device Manager before downloading a driver
Right-click Start and select Device Manager, then expand Display adapters. The entry here tells you whether Windows recognizes the actual graphics hardware and which driver stack it is using.
If the adapter is listed by name—such as Intel Iris Xe Graphics, AMD Radeon Graphics, or NVIDIA GeForce RTX—open it with a double-click and inspect the Device status message on the General tab. A warning icon, a disabled device, or an error code means the resolution control is a symptom of a larger driver or hardware problem. Choose Enable device if that option is present, then restart Windows.
If Device Manager instead shows Microsoft Basic Display Adapter, Windows is using a generic fallback driver rather than the full driver for the GPU. Intel documents that this condition can lead to restricted display resolution, and its support material directs users to install the appropriate Intel graphics driver. The same principle applies to AMD and NVIDIA hardware: install the compatible driver from the PC maker for laptops and prebuilt desktops, or from the GPU maker when it specifically supports the hardware.
For laptops, prefer the system manufacturer’s graphics package first. Many laptops combine integrated graphics with a discrete GPU, and their display outputs, power features, firmware, and panel behavior can depend on an OEM-customized driver. Installing a generic package is sometimes appropriate, but it should not be the first response when the laptop vendor provides a newer compatible driver.
Avoid “driver updater” utilities and download sites that bundle unrelated software. Microsoft’s Device Manager documentation advises obtaining a compatible driver from the device manufacturer when Windows cannot provide one. Record the adapter name and current driver version before changing anything: Device Manager > Display adapters > your adapter > Properties > Driver.
Repair the display driver in the safest order
Use the least disruptive repair that matches the timing of the problem. If the resolution setting became unavailable immediately after a driver or Windows update, rolling back is more targeted than immediately seeking a newer package.
First, check Settings > Windows Update and install offered Windows updates, including optional driver updates only when they clearly match your display hardware. Microsoft notes that unexpected resolution changes can require a graphics-driver update, but Device Manager’s “Search automatically” option can report that the best driver is already installed even when the PC maker has a better-matched package available. Check the computer or graphics manufacturer’s support page if Windows finds nothing.
If the issue began after an update:
- Open Device Manager and expand Display adapters.
- Right-click the affected adapter and select Properties.
- Open the Driver tab and choose Roll Back Driver.
- Confirm the rollback and restart the PC.
The Roll Back button is unavailable when Windows has no previous driver package to restore. Administrator permission is also required. If rollback fixes the problem, leave the working driver in place while checking whether the PC or GPU maker has released a newer corrected version; repeatedly installing the same problematic driver is not a repair strategy.
If rollback is unavailable or does not help, choose Update driver in Device Manager. Select Search automatically for drivers only if you do not already have a driver package from the hardware maker. If you downloaded an official package, install it through its own installer where possible; use Browse my computer for drivers only when the vendor provides unpacked driver files or specifically instructs you to do so.
Reinstall only the affected display adapter
If the resolution menu remains disabled after the connection checks and driver update, reinstall the display adapter. Save open work first. Your screen may blink, change size, or temporarily fall back to low resolution during the process.
In Device Manager, expand Display adapters, right-click the affected GPU, and select Uninstall device. If Windows offers Attempt to remove the driver for this device, use it only when you have already downloaded the correct replacement driver or can reconnect to the internet after restarting. Then restart the computer.
Microsoft’s support documentation says Windows attempts to reinstall the driver after reboot. Return to Device Manager and confirm the proper GPU name has returned, then install the official driver package if Windows remains on Microsoft Basic Display Adapter or if the correct resolution choices have not returned.
Do not manually delete driver files from the Driver Store to make this process more “complete.” Microsoft’s driver documentation warns that manual removal can produce unpredictable behavior. For ordinary resolution problems, Device Manager’s uninstall-and-restart path is sufficient and reversible.
After the reinstall, return to Settings > System > Display, select the intended monitor, and check Display resolution again. If the control is active, choose the Recommended mode, then open Advanced display to confirm the selected display and set an appropriate refresh rate. Resolution and refresh rate are separate settings; a monitor may support its native pixel count but not the highest refresh rate over the current cable, port, dock, or adapter.
If the selector is still grayed out while Device Manager shows the correct driver and Windows detects the monitor, the remaining evidence points outside the basic Settings repair path: a failing cable or dock, incompatible display chain, bad monitor capability data, GPU hardware trouble, or a vendor-specific firmware issue. Testing the PC directly with another display is the fastest way to separate a Windows driver problem from the hardware connection that is preventing Windows from offering usable display modes.
